SeeminglyArbitrary minimal but not meaningless
How to setup a blog on GitHub Pages

Let me just start with a quick intro statement. Setting up a proper blog and posting some ideas online has been on my to-do list for a long time and I have finally decided to actually do it now. The purpose of this site is not to share any Earth-shaking ideas but to document some fun stuff I am playing around with.
I often notice that sometimes I get excited about a topic and enthusiastically spend a weekend focusing on it (some computer science-related), but then I just get back to my normal things to do. However, it often happens that a related idea pops up in my mind and I want to go back and revisit what I have done before. The problem is that very regularly I forgot about the small details and the exact steps needed, so I end up searching “how to …” on Google and opening 20+ tabs to learn the process again, which is let’s be honest quite unproductive.
As of today, I will make an attempt to overcome my previous mistakes on wasting time with the long process of relearning previous ideas, hence this blog. So my goal is to have a repository for all these small things I have been learning once in a while and maybe it can be useful to someone else who reads some of my posts. And I think the best place to start is a post on how I managed to set up this site, so let’s get into it!
Why GitHub Pages?
There is a huge selection of sites that offers you a nice and easy platform to launch your blog-type site and first I have just looked at the most common ones. I guess many are familiar with WordPress and as it offers a low-cost (=free) version, I gave it a try. But I quickly realized that the free version doesn’t give you that much freedom and the themes you can select are barely customizable. The other main problem was the lack of a straightforward way to display math formulas, which is quite important in my case. So I have tried to look-up some other sites and I came across GitHub Pages. I have been coding for a while and in my work, I have got familiar with the Git framework and since then I have been sharing my private codes on GitHub as well. I have read good reviews about the GitHub Pages solution and as my experience with GitHub is very positive, I decided to give this one a try too.
Overall what I can say just after a couple of days of using it is that you need a little bit of confidence working with HTML, markdown, CSS, and using a terminal but if you are familiar with those, you can get a well-customized blog up and running quite quickly, and writing posts in the future is just extremely easy.
The framework I have been using is Jekyll, which is a simple way to set up a static blog-aware site and it is supported by GitHub Pages. In the following sections, I will provide a step-by-step description of how to set up your blog on GitHub Pages using Jekyll on Windows (however the steps are very similar in other operating systems as well).

What do we need?
- A GitHub account and Git installed to your local computer: GitHub Pages operates in the Git framework, therefore you will store your files in a repository, and making changes or creating a new post can be done by commits to your repository.
- Ruby and Jekyll: Jekyll is written in Ruby, however, you don’t have to be a Ruby developer at all (the first time I encountered Ruby was when I launched this site). You can install Ruby and Jekyll by RubyInstaller. When you install it, make sure you run
ridk installat the final step. Once it is done, rungem install jekyll bundlerin a command prompt window and if it has finished you can check which jekyll version has been installed byjekyll-v. These steps can be found on Jekyll’s official webpage here. - Visual Studio Code: Actually any IDE or text editor does the work, but VSCode is just my own preference.
Create a new project using default themes and run it locally
Creating a new blog using the default theme is very easy, you just have to follow these steps:
- Create an empty public repository.
- Clone the repo to your local computer.
- Open up a terminal and navigate to the folder which contains the cloned repo.
- Run
jekyll new ., this will create the Jekyll-related files that you need to operate your blog. - Run
bundle install(orbundle update) to install the gems in the Gem file. - Run
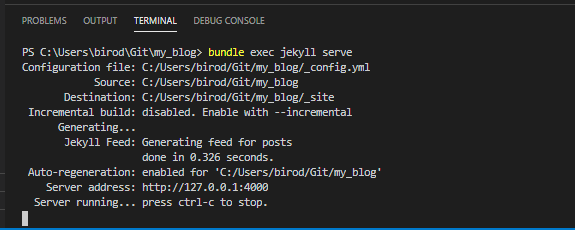
bundle exec jekyll serveto serve your blog on your local computer. A link is generated that you can open in a browser to see how your site behaves. This is useful to see your edits locally before you publish them online.
 It can be shut down by
 ctrl+c. This first version we created is using the built-in Minima theme (you can check thethemesetting in the_config.ymlfile) - Commit and push your edits to the master branch.
Hosting the blog on GitHub Pages
Once your changes are in the GitHub repo, you can host your site online:
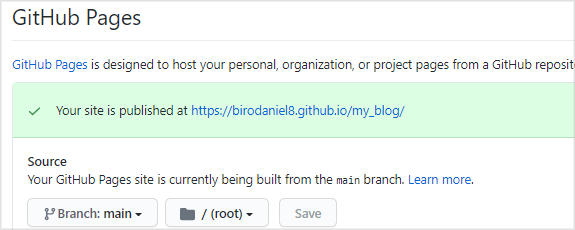
- Go to your repository settings and by scrolling down to ‘GitHub Pages’, you can select the source branch to your GitHub Page.
- Select
masterand/(root)and save. - After the page is reloaded you can scroll down again and you will find the url where your site is published:

- Wait a couple of minutes (the page has to be rebuilt at every change and it might take some time) and check your site up and running.
- You might see that your blog doesn’t look the same as the local version and you get 404 error if you want to read a post. This is due to some settings of the path for the layout and site files. Go back to the editor and in the
_config.ymlfile, set theurlvariable tohttps://<username>.github.iowith your GitHub username and thebaseurlto/repo_namewhere the name of the hosting repo should be included. The_config.ymlfile is actually quite well commented to figure out the role of the listed configuration variables (like title, email, twitter_username). - Commit and push your edits to the master branch and after a couple of minutes, the online hosted site should look like the local one.

Create your first blog post
Creating a new blog post is very easy in the Jekyll framework and it can be basically done by creating a new markdown file for each of your posts. If you navigate to the _posts folder you can already see an example file. The files should be named as YYYY-mm-dd-post-name.md, all separated by - (but this info can be overwritten within the file). The markdown file contains some header where you can store the title, author, date, etc followed by the body of your post. The formatting is based on markdown, so let’s get familiar with it if you haven’t used it before; it is extremely easy to pick up.
What else is in the Jekyll-created files/folders?
When you created your site with Jekyll a lot of files has been generated. We have seen that the _posts folder contains all your blog posts in markdown files and the _config.yml file contains some basic variable settings for your site. These can be cited by site.variable_name in the html files later on. But there are some other interesting files/folders created:
- Gemfile: The gemfile contains some Ruby-based apps which responsible to run your site and also lists some plug-ins you might use (such as the RSS feed plug-in). When you run the bundle installer, the gems are installed from this file, however, using some non-default themes I faced problems using different gems listed here. It recommends you to comment and uncomment certain lines if you use GitHub Pages (see the comments within the file), which resulted in some failures to publish my site online. My final solution is to have
source "https://rubygems.org"and the plug-ins to be installed in my gemfile:
source "https://rubygems.org"

# If you have any plugins, put them here!
group :jekyll_plugins do
  gem "jekyll-feed", "~> 0.6"
end

# Windows does not include zoneinfo files, so bundle the tzinfo-data gem
gem 'tzinfo-data', platforms: [:mingw, :mswin, :x64_mingw, :jruby]
gem 'jekyll-paginate'
gem 'jekyll-sitemap'
gem 'jekyll-seo-tag'
- _site folder: Whenever you make a change in your files, Jekyll regenerates the html files for your whole site and stores them in the
_sitefolder. You can check how your simple blog post markdown files have been converted to proper static html pages. - index.markdown: This is the home page that will open up. Looking into the file you can see its content is quite short. The code basically says Jekyll to include the
homehtml file from thelayoutfolder from the Minima theme (more on this later).
Working with default themes
In our first example, a built-in theme (Minima) was used to create the layout of the site, but other supported themes can be also used. If there is an update for a given theme it automatically applies to your site. This can be useful, but if you made any changes to the layout, an update will overwrite it and might break your site. You can cut off this dependency by removing the theme: minima line from your _config.yaml file. But then you also have to add the already existing theme-related layout files to the folder of your project (on Windows the required files for Minima are stored in: C:\Ruby27-x64\lib\ruby\gems\2.7.0\gems\minima-2.5.1).
Using Jekyll themes
Although GitHub Pages has its supported themes, Jekyll has a huge library of themes that you can apply and easily set up by the following steps:
- Choose a theme you like from a given library. I am currently using the Lagrange theme.
- Open the theme’s GitHub repository
- Fork the repository
- Rename the repository and set the GitHub Page settings of the repo as discussed before (note that some themes use other branches like ‘gh-pages’ as default)
- Clone the repo to your local computer to make changes and create blog posts and all the other steps work just as with the default themes.
- Note that some themes have dependencies that might break your page at first and also some need a different (or no) configuration for the
urlandbaseurlvariables. Always read the theme’s ReadMe file first, it might contain useful lines.
Customizing the layout
The applied Jekyll theme probably has more files and folders than what the simple new project created. The exact folders you see depends on the selected theme, however there are some quite common ones:
- _layouts folder: All theme contains a
_layoutwhere you can customize the structure of your blog. The aforementionedhome.htmlfile is also here. If you open up one of the html files, you might see some code which is not basic html, like this:{% if paginator.next_page %} <a href="{{ site.github.url }}{{ paginator.next_page_path }}">{{ site.data.settings.pagination.previous_page }}</a> {% endif %}
Jekyll supports the Liquid template language which can be useful to include if-else or for-loop type statements.
- _includes folder: This folder contains some shorter html files (header, footer, menu) that can be included to pages easily by a simple line eg.:
{% include header.html %} - main.css: Somewhere in your folders a
.cssfile is responsible for CSS formatting of your page. You can easily customize it.
How to add math formulas?
The straightforward handling and display of math formulas was an important factor for not choosing another platform for my blog. Jekyll offers several ways to incorporate beautifully typed formulas but my choice became the often used MathJax. It is a JavaScript based engine which works well in most of the popular browsers and using it is super simle:
- Add a file named
mathjax.htmlto the_includesfolder and paste the following into the file and save it:<script type="text/x-mathjax-config"> MathJax.Hub.Config({ tex2jax: { inlineMath: [ ['$','$'], ["\\(","\\)"] ], processEscapes: true } }); </script> <script type="text/javascript" charset="utf-8" src="https://cdn.mathjax.org/mathjax/latest/MathJax.js?config=TeX-AMS-MML_HTMLorMML"> </script> - Add
{% include mathjax.html %}to one of the layouts that are always included (I added it to thedefault.html) - You just need to put your LaTeX type code between
$signs for inline formulas and$$for equations in new lines.
Username.github.io as domain
By default the URL of your GitHub page is accessible via <username>.github.io/<repo_name>, however on each account you can select one of the repo pages and use it as your GitHub User Page. The only thing you have to do is to rename the selected repo to <username>.github.io:
 Wait a couple of minutes to rebuild and your user page is up and running.
Useful resources:
This post summarizes my experience on setting up a blog-type site on GitHub Pages and I have used mostly the following resources:
- GitHub Pages and Jekyll playlist of Bill Raymond
- How to Start a Blog or Personal Website Using Jekyll and GitHub Pages
- Github Pages and Jekyll Tutorial playlist of WebJeda
- How to Create a Beautiful Jekyll Blog?
- LeNPaul/Lagrange Jekyll theme
